Soil Management: General
[addw2p name=”soilMgmtGeneral”]
Introduction
The last 10 years saw a rapid expansion of land for plantation tree crops in south-east Asia, particularly in Malaysia and Indonesia. By 1993, Malaysia had 2.3 million hectares of oil palms, 1.8 million hectares of rubber and 0.4 million hectares of cocoa (Tay et al., 1995), which are growing by the days. Plantation tree crops are now cultivated on a diversified range of soils and landforms with increasing proportion of marginal soils. Our understanding of the physical, chemical and biological factors that control the fertility and productivity of soils has advanced greatly to allow us to exploit them effectively. In fact, an appreciation of this dynamic mechanism has led to an extensive use of soil information during this rapid expansion of oil palms in south-east Asia. The success story of our plantation industry owes partly to proper soil management practices, which evolved from both research and experience.
While good soil management has enable the continuous cultivation of plantation trees on the same land for over 3/4 of a century or after 3 generations of crops, poor soil management has dire consequences. For example, Goh and Chew (1994) showed that without manuring, the mean fresh fruit bunch (FFB) yield of oil palms was 32 t ha-1 yr-1 on Selangor series soil compared to 15 t ha-1 yr-1 on Rengam series soil. However, with manuring similar oil palm yields were obtained from both soil types. The increasing use of marginal land also dictates good soil management to ensure competitiveness and economic viability. This demands a correct identification of the types of soil limitations present and assessment of the degree of severity of each limitation in order to determine the most appropriate soil management practices required to fully exploit the yield potentials of the crops.
No agricultural system will be sustainable if it is not economically viable both for the farmer and the society of which he is a part (Johnston, 1995). Therefore, the importance of high early yields and sustainable yields from the economic stand point is obvious. Plantation tree crops being perennials, are subjected to large fluctuations in yields and prices of inputs and outputs. Coupled with the large investments and fixed costs involved in the industry, the maximum economic yield is usually at or near the site yield potential (Goh et al., 1994). There is now evidence to show that the inputs required to obtain the site yield potential do not necessarily endanger the environment, cause soil degradation nor reduce quality of the products (Chew et al.,1994a).
This paper, written in two parts, reviews the relevant soil management practices used in plantation tree crops for the humid tropics. Part one covers the general soil management practices while part two presents specific soil management practices to improve problem or marginal soils. This paper is restricted to oil palm, cocoa and rubber but the principles and practices should be applicable to most perennial tree crops.
Reference
Goh, K.J. and Chew, P.S. (1995). Managing soils for plantation tree crops. I. General soil management. In: Course on Soil Survey and Managing Tropical Soils (ed. Paramanathan, S.). MSSS and PASS, Kuala Lumpur: 228-245.
Note: The full list of references quoted in this article is available from the above paper.
Establishment: Concluding Remarks
Bearing in mind that an oil palm planting would have more than twenty years of productive life before it has to be replanted, the inputs at replanting and during the palm establishment period as mentioned in this article are highly justified. A well planted and well maintained stand of oil palm would reward the planter with sustainable high early and mature yields, provided the other agro-management requirements (such as nutrition, pest control etc. which are not discussed here) of the palms are also well taken care off.
Establishment: Costing
Typical costings (Rossi et al, Unpublished) of some of the above operations for the first 12 months are summarized in the table below:
|
Work Operations
|
Cost (RM/ha)
|
|||
|
Estate A
|
Estate B
|
Estate C
|
Average
|
|
| Legume planting |
252.00
|
260.68
|
173.30
|
228.66
|
| Holing and planting |
531.71
|
618.08
|
497.39
|
549.06
|
| Circle spraying |
107.99
|
96.65
|
155.11
|
119.92
|
| Spot spraying |
71.06
|
60.47
|
261.83
|
131.12
|
| Legume purification |
180.00
|
211.50
|
Not available
|
195.75
|
| Decreeping |
211.14
|
15.96
|
50.42
|
92.51
|
|
Total
|
1353.9
|
1263.34
|
1138.05
|
1317.01
|
Establishment: Weeding Operations in Immature Oil Palms
Weeds are plants growing in areas where they are not wanted and are more harmful than useful, even after their possible beneficial effects have been taken into account (Koch et al, 1983). Chung (1997) reported that since weeds can reduce crop growth and yield, interfere with harvesting, crop recovery and other agricultural operations, control measures are necessary.
According to Corley et al. (1976), the following four types of weeding operations will be necessary in areas where legume covers are maintained:
-
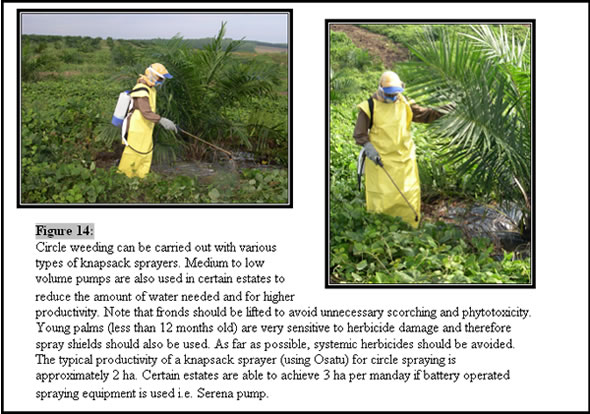
circle weeding of palm circles (Figure 14) – for young palms, circle weeding is normally carried out to prevent weed competition
-
strip weeding to provide access for harvesting and other field operations – more relevant for mature palms
-
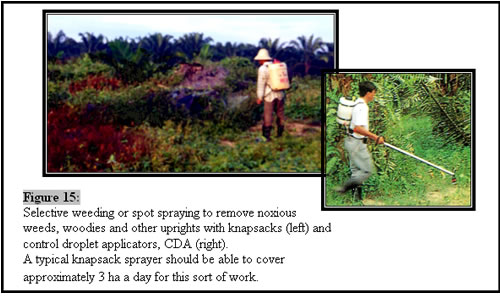
selective spot weeding to remove noxious weeds from the legume covers or natural ground covers (Figure 15 and Figure 16) and
-
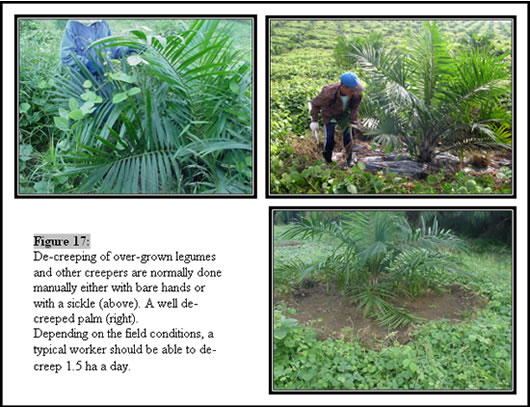
periodic control of legume covers if growth is too vigourous – de-creeping for example (Figure 17)
The various herbicide application techniques and their respective productivity are highlighted in Teoh (1991) and Chee and Chung (1998). The latter also recommended the types of herbicides to be used for controlling the different types of weeds.

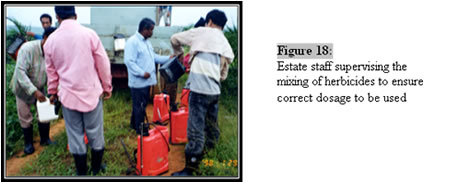
Another necessary estate practice would be calibrating and checking to ensure the correct dosage of herbicides to be utilized for each equipment prior to the actual weeding work (Figure 18). It should be emphasized that the quality of herbicide application (correct dosage, proper usage of equipment and correct area of application) should precede that of quantity or productivity (how many hectares a person or equipment can do in a day) of applying the herbicides. It would be of no use spraying a large area but not getting the desired kill as inevitably, the job has to be repeated. The same principle should also apply to pesticide spraying i.e. controlling rhinoceros beetles with Cypermethrin.
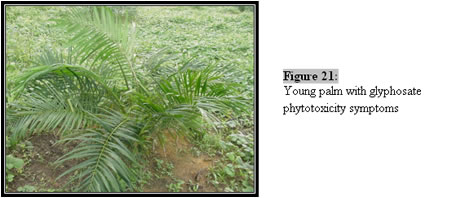
With the usage of AA+ Mulch, better control of weeds and creepers is possible (Figure 19). Problems of phytotoxicity (Figure 21) and lower frond scorching are also reduced, as herbicide spraying is more easily carried out, thus promoting better palm growth (more leaf area with minimal scorching) resulting in high early yields. The AA+ Mulch would also be useful if planting is to be carried out in difficult areas such as in steep terrain areas, to reduce the need for frequent fertilizer applications and weed control (Figure 20) during the first year of planting.


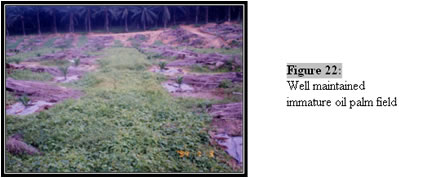
With proper field upkeep i.e. timely and quality circle and spot spraying, the young immature oil palm field should look like Figure 22.
Establishment: Holing and Planting of Palms
The oil palms are preferably planted 1 month after the planting of legumes and the following are some of the normal planting operations:
-
lining (Figure 9)
-
holing (Figure 10)
-
final selection of nursery palms and transporting them to the field (Figure 11)
-
application of rock phosphates into the planting hole, removal of polybag and the actual planting (Figure 12)
-
firming up the base of the newly planted palm (Figure 12)


At palm planting, AA+ Mulch (Figure 13) with one year’s supply of fertilizer could also be utilized. Other benefits of this system would be discussed in section 4.0.

Establishment: Legume Planting
Besides protecting exposed soils (Figure 1) from risks of run-off and soil erosion, legumes play an important role in soil conservation in our humid tropics as exposed tropical soils weather rapidly, the soil structure deteriorates, the organic matter content decreases and nutrients are lost through leaching (Corley et al). Therefore, legumes are planted as soon as land clearing and preparation is completed to cover up the bare ground quickly. In addition, legumes also play a role in weed management (Chung, 1997) by smothering out the weeds.
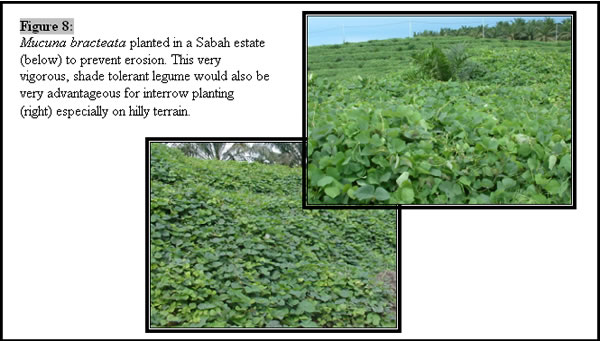
In addition, legume species planted in oil palm areas are able to produce large amounts of organic matter as well as fix large quantities of atmospheric nitrogen. The total biomass of conventional legumes (P. phaseoloides and C. caeruleum) at the end of the third year was 5.9 tons/ha and with newer species of legumes i.e. Mucuna bracteata (Figure 8), total biomass of 17.2 tons and 12.1 tons on flat and terraced land respectively, can be obtained (Chee and Chung, 1998). Other beneficial effects of legumes have been reported by Gray and Hew (1968) and Broughton (1977).
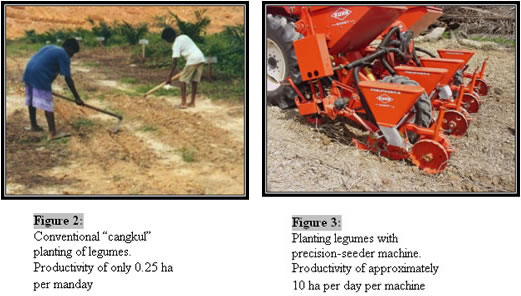
Planting of legumes has evolved from the conventional “cangkul” method to the more modern “precision-seeder” (Figures 2 and 3).
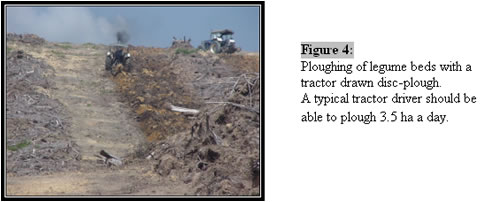
Prior to sowing of the legume seeds, ground preparation such as ploughing of legume beds with a tractor drawn disc-plough and harrowing is carried out (Figures 4 and 5)
. 

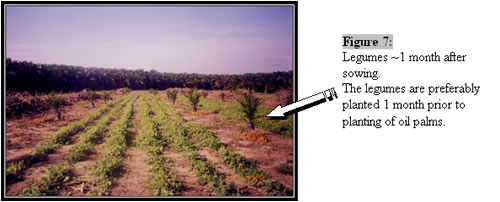
Legume establishment is expedited with applications of rock phosphate and ground magnesium limestones (Figures 6 and 7).

Oil Palm: Establishment
TOWARDS THE ESTABLISHMENT OF A GOOD OIL PALM PLANTING
Introduction
Legume planting
Holing and planting of palms
Weeding operations in immature oil palms
Costing
Concluding remarks
Oil palms are normally planted after land clearing and land preparation work, which includes lining, holing and terracing if the terrain is hilly. In low-lying areas, drainage would also be necessary. In most oil palm plantings, leguminous cover crops are also planted in the interrows as they are able to establish and spread much faster than other vegetation. The legumes should preferably be planted prior to planting the palms but in many instances, due to timing and other constraints, the oil palms are planted first.
The immaturity period of the palms, which would normally last approximately 30 – 36 months where ablation is done, begins from the moment of palm planting. In areas where no ablation is done, this is reduced to 24 months. Most planters would deem the immaturity period as the period where extensive field maintenance is required e.g. circle spraying, spot spraying, decreeping, manuring, pest control etc. to ensure not only high early yields be obtained, but also mature yields. This article highlights some of the work that a planter has to plan and carry out at the onset of oil palm planting particularly those related to legume establishment, holing and planting of the palms and the subsequent weeding operations. This article also complements the other two articles in the previous two issues of this annual report.

Reference
Ng H.C.P. and Tan C. C. 2003. Towards the establishment of a good oil palm planting. Annual Report 2002. Royal Johore Planters’ Association : 22-30.
Note: The full list of references quoted in this article is available from the above paper.
Nursery: Summary of Recommendations
The selected area for a nursery should be on flat to gently undulating terrain, accessible with good road conditions and not prone to flooding.
The preparation of nursery area should be carried out through proper designing of nursery, clearing, fencing and lining.
The ordering of seeds should be scheduled appropriately over a period of time to ensure that adequate labour is available to handle each batch of seeds received and for field planting.
The selection of single or double stage nursery should be decided based on the area to be planted and the size of the nursery.
The nursery practices/maintenance including watering manuring, culling, pest and disease control and weeding should be closely supervised to ensure that all operations are on time and correctly implemented.
Herbicides and equipment for herbicides spraying should be clearly marked and stored separately from pesticides and foliar fertiliser to prevent contamination or incorrect chemical selection. Mistakes in this operation are usually costly and difficult to undo hence should be avoided at all costs.
Nursery: Maintenance
Watering
The most important factor in achieving good success in the nursery is the availability of sufficient water to ensure optimum growth of the seedlings. More often than not inadequate watering is the root of pest and disease problems in the nursery as the seedlings would be at a weaken stage and therefore more prone to pests and diseases. A good indication of inadequate watering in the nursery is the incidences of collante and blast disease.
Poor or uneven coverage of the irrigation system may also lead to seedlings of poor uniformity. This is a very common fault in nurseries. Watering must be done daily including holidays.
With the current technology of irrigation system in the nursery either by overhead sprinkler system (OSS) or lay flat sprinkler tubes (e.g. Sumisansui, photo 5 & 6), the watering should be carried out twice a day for 45 minutes each time, to supply 8mm of water daily. A rain gauge may be used to check whether the amount of water supplied is sufficient.

Manuring
It is well established that the fertiliser rates for nurseries require adjustment to varying management practices and according to different soil types (Hew & Toh, 1973). However the recommendations and system described in this paper are based on sandy clay loam, inland soils for general usage and on conventional fertilisers or controlled/slow release fertilisers.
Manuring programme based on conventional fertiliser
Fertilisers are not required until one complete new leaf has appeared (4 -5 weeks after planting). Use of conventional fertiliser should preferably be confined to small nurseries for field plantings of less than 50 ha or areas with adequate labour. The programme is given in Table 2 below:
|
Seedling age
|
Table 2. Conventional fertiliser manuring programme
|
||
|
(Weeks)
|
(Months)
|
||
|
Pre nursery stage
|
5-8
|
2
|
Weekly drench with a soluble foliar fertiliser (formulation of 22:22:10:1) at 15 g in 4 litres water for 100 seedlings.
|
|
9-12
|
3
|
Weekly drench with a soluble fertiliser (formulation of 22:22:10:1) at 15 g in 4 liters water for 25 seedlings.
|
|
|
Main nursery stage
|
13 – 16 (transplanting) |
4
|
Mix 100g RP/bag in soil medium for large bags. After transplanting no solid fertiliser application for 4 weeks but continue weekly fertiliser drench as for 3rd month
|
|
20
|
5
|
5 g CCM45/bag. If seedlings are chlorotic, continue weekly foliar drench as for 3rdmonth. Drench with HGFB solution*
|
|
|
24
|
6
|
10 g CCM45 and 10 kieserite/bag
|
|
|
28
|
7
|
15 g CCM45. Drench with HGFB solution*
|
|
|
32-39
|
8-9
|
20 gm CCM45
|
|
|
40-47
|
10-11
|
30 g CCM45
|
|
|
48
|
12
|
35 g CCM45
|
|
|
>52
|
>13
|
30 g CCM45 + 15 g kieserite
|
|
*Dissolve HGFB48 at 1 g/10 litres water for 7 months old and younger seedlings. For seedlings of 8 months and older, use a rate of 3g /10 litres water. The seedlings should be drenched with the HGFB solution at a rate 500ml/seedling.
Fertiliser application
For foliar application, the drenching of the seedlings with foliar fertiliser solution should be carried out early in the morning or late afternoon. As far as possible, the whole seedlings should be wetted and no watering of the seedling should be carried out for the day of application. However High Grade Fine Borate Compound ( HGFB ) solution application for large polybags should be done after normal watering.
For solid application, the compound fertiliser should be weighed to obtain the correct rates, and calibrated applicators (e.g. scoop, spoon, etc.) given to the workers to ensure that the correct rates are applied. The fertiliser should be evenly distributed on the surface of the polybag soil at least 2-4 cm away from the base of the seedlings. The application of solid fertiliser should be carried out when the seedlings are dry, i.e. in the morning before watering, or in the afternoon after the morning watering.
Good supervision of all fertiliser applications is necessary to obtain full benefits from the inputs.
Manuring programme based on slow release fertilisers
There are many types of slow release fertiliser (SRF) currently available in the market. The SRF selected for use should supply the required nutrients at the right time and amount to the seedlings for good growth.
Fertiliser rate
The general recommendation for use of SRF in the nursery is provided in Table 3 .
|
Seedling age
|
Table 3. Slow release fertiliser (SRF) manuring programme
|
|
|
(Weeks)
|
(Months)
|
|
|
1 – 12 |
3
|
Follow manuring programme for conventional fertilizer or 7.5g SRF per seedling
|
|
16 |
4 |
75 g SRF per seedling
|
|
20
|
5
|
15 g kieserite. Drench HGFB at 5th & 7 month.
|
|
40 – 48
|
10 – 12 |
30 g CCM45/seedling/mth.
|
Fertiliser application
The SRF should be spread evenly and buried at 10 cm below the soil surface.
Supplementary fertilisers should be applied from the 9th month onwards or even earlier if the seedlings show symptoms of deficiencies like yellowing, etc.
Corrective fertiliser application
With the use of SRF, it is essential to monitor the colour and growth of the seedlings regularly due to the long interval without any other fertiliser application. In cases of wrong or inadequate application as indicated by seedling colour and vigour, fertiliser supplementation is required as per conventional fertiliser programme for the appropriate seedling age provided in Table 2.
Culling
Culling is one of the most important procedures to be carried out in the nursery to ensure that only the most uniform and vigorous palms that are likely to give the highest yields are planted in the field.
Four rounds of culling are recommended during the nursery period. In addition, a final round of selection should be done just before field planting.
Culling in the pre-nursery stage
Culling at the pre-nursery stage is carried out at month 2 and prior to transplanting the main nursery at around month 3 to 4.
This is one of the main advantages of the double stage nursery system where the first stage culling of undesirable palms can be done stringently and quickly over large number of young seedlings. The main types of undesirable seedlings (should be culled) at this stage are as follows: narrow (grass leaf), rolled leaf, twisted leaf, crinkled leaf, collante and stunted or weak (runts) palms. Allow for 10 to 20% culling at this stage.
Culling in the main nursery
Culling in the main nursery should be carried out when the seedlings are 7 months and 9 months old while the fronds of neighbouring palms have not started to overlap and etiolation not set in to mask the runts. The typical characteristics of abnormal seedlings in the main nursery are as follows: –
Erect, flat top, broad pinnae, narrow pinnae, wide internodes, juvenile (slow to pinnate), weak and slow growing (runts), crinkled leaf, collante, chimaera, badly diseased (helminthosporium, curvularia, blast, crown disease) and palms badly damaged by chemicals.
The final round of selection based on uniformity and vigour should be carried out just before the seedlings are being loaded onto lorries/tractors for transport into the field. If planting is delayed the final round of culling must be carried out before etiolation sets in. Allow for 5 to 10% culling and selection for the main nursery.
Timely culling rounds will ensure the unnecessary keeping of unwanted seedlings and reduce costs in the nursery.
Recording
Accurate records of discarded seedlings are necessary to ensure that adequate seedlings are available for field planting and supplies.
Pests and Disease Control
This is another important aspect in oil palm nursery management. Pest infestations and disease infections can cause alarming damage and losses if not recognized at an early stage and brought under control quickly. Most pest and disease problems can be avoided by correct agronomic and management practices, but where they are unavoidable, early detection and prompt control measures are crucial.
Common pests and diseases in the nursery
Common pests in nursery are red spider mites, leaf-eating caterpillars, cockchafers, grasshoppers and rats. The common diseases are mainly fungal leaf diseases like curvularia, cercosporium and helminthosporium.
Pest and disease control
There are a number of measures which if implemented can assist in reducing the incidence and severity of pest and disease attack in the nursery. The key to good P and D control is vigilance and prompt action to contain the problem.
Prophylactic spraying
Routine prophylactic spraying is not necessary if the seedlings are growing vigorously and the nursery is well managed.
However, where nursery palms are sub-optimal in growth and vigour, fortnightly prophylactic spraying of fungicides and insecticides may be carried out until palms return to normal growth.
Pesticides may be mixed with foliar fertilizer mixtures in a single application but these should be confirmed with the supplier if in doubt.
Spraying should preferably be carried out in the evening after the last watering.
Training of nursery workers in pest and disease recognition
It is certainly worthwhile to train nursery workers to recognise the symptoms of common pests and diseases in the nursery and report them. This outbreak reports by people who are working full-time in the nursery will provide an “early warning” system to the management.
Weeding
Weeds in the nursery area should be eradicated since some weeds may harbour pests or are hosts for diseases. It is necessary to keep the polybags completely free of weeds that would compete for nutrients, moisture and sunlight. Ideally the nursery should be weed-free.
Weeding in the pre-nursery stage
In the pre-nursery where seedlings remain for only 12-16 weeks, very little weeding is required. When necessary, hand weeding in the inter-bed paths and within the small polybags should be carried out monthly.
It is generally recommended that all herbicides be avoided at this stage in view of the fact that any error can lead to serious seedling damages or losses.
Weeding in the main nursery stage
Mulching with palm kernel shells can greatly suppress the growth of weeds in the large polybags and any weeds appearing can be quickly and easily hand-weeded.
However, weeds on the ground and surrounding nursery area should be eradicated through chemical spraying as and when required. Only contact herbicides eg. paraquat should be used.
Storage of Chemicals and Equipment
The control of chemicals in the nursery is of the greatest importance. Many instances have occurred of herbicides being incorrectly utilised by mistaking them for insecticides or fungicides. In view of this problem it is strongly recommended that the estate have a separate nursery store and within the store, herbicides are kept separated from pesticides/foliar fertilizers in lockable cupboards. It is also important that nursery equipment used for spraying pesticides and herbicides be also clearly marked and kept apart in separate storage compartments to avoid costly mistakes of cross contamination. They should only be used in the nursery. Empty herbicide and pesticide containers should be discarded and not reused.
Nursery: Set-up
The decision to have a single stage or double stage nursery will be a matter of personal choice depending on the specific situation encountered e.g. a double stage nursery is advisable for a large scale planting (>500 ha).
The Single Stage Nursery
This system utilises only large polybags and the germinated seeds are planted directly into the bags in the same manner as planting out in the pre-nursery polybags as described in section on planting germinated seeds into the large polybags.
Some of the advantages of this system are:-
-
once the seed has been planted, there is no further movement until field planting so that the root system is not disturbed and therefore establishment and growth is faster.
-
one can dispense with all the requirements in terms of layout, equipment and labour of the pre-nursery.
However this system has a number of disadvantages: –
-
it is necessary to have the full nursery infrastructure ready from the initial seed delivery.
-
it requires greater volume of water and additional engine fuel, wear and tear for the first two or three months.
- it also requires more soil since all the culling is done at the large polybag stage.
-
it is more difficult to observe and supervise when the seedlings are spread over a large area.
-
there will be no space for receipt of the following year’s seed delivery in case of delays in any one year’s planting programme unless the nursery is enlarged.
-
culling and seedling replacement is cumbersome.
-
it is not advisable for large scale planting which requires a very large area to prepare and also involves high cost.
-
difficulty in providing proper shading to the germinated seedlings at planting.
The Double Stage Nursery
The double stage nursey system involves planting of the germinated seeds in small pre-nursery polybags packed closely together in a very small area for the first two to three months. The seedlings are then planted out in the large polybag nursery where they remain for a further 7-9 months before field planting. This system has a number of advantages over the single stage nursery such as:
-
only a small section of nursery is required for the first 2 to 3 months.
-
less irrigation required for the first 2 to 3 months.
-
easier to observe seedlings and supervise nursery work during the critical early stage (2 to 3 months after planting).
-
culling can be carried out very quickly and easily at the first stage before planting into large bags.
-
the double stage nursery also has some disadvantages namely:
-
an “extra” operation is created which is very labour intensive.
-
possible slower growth compared to the single stage especially with poor shade management.
-
poor transplanting technique from small to large polybags could give rise to severe transplanting shock.
NURSERY SET-UP (Double Stage Nursery)
Since the double stage nursery is commonly adopted in most of the estates, only this type of nursery is described.
The Pre-Nursery Stage
Polybag filling and placement
Polybags must be filled with soil up to the bag rim and placed in the nursery beds at least four weeks before the planting date to allow settling, topping up with soil and pre-planting irrigation.
Only the best topsoil available should be used in any nursery. The soil must be free draining, friable, sandy clay loam (eg. Rengam, Serdang, Bungor) and free from contaminants (chemicals etc.). Rock phosphate (RP) (@ 10 kg/1000 small polybags of 15 cm (6 in) x 21 cm (9 in) x 250 gauge) must be premixed into the soil prior to filling to ensure adequate P availability.
The polybags should be turned inside out before filling so that they sit upright. Hoppers or funnels may be used to facilitate filling. The filled polybags should be arranged in beds of 10 bags width and of a convenient length. The beds should have wooden side frames to prevent bags from toppling over. The arrangement of polybags at pre-nursery stage is shown in photo 1.

Shading
At this critical stage it is necessary to shade the plants either with palm fronds on frame, or with shade netting of 70% shade. If oil palm fronds are used as shade it is necessary to pre-spray the fronds with a pesticide to ensure that they are not instrumental in introducing any pests or diseases. The shade should be gradually reduced after the first month and should be totally removed by the end of the second month. The shading in the pre-nursery stage using oil palm fronds and netting is shown in photos 2 and 3 respectively.

Planting germinated seeds into the polybags
It is essential to ensure that polybags are well watered just prior to the commencement of planting. Planting of germinated seeds should be completed as soon as possible, preferably not later than 1 day after receipt.
Care must be taken to ensure that the workers can differentiate between the plumule (shoot) and the radicle (root) to avoid planting the seeds upside down. The seed should be planted at 1 cm depth with the radicle pointing down and lightly covered with soil. Planting holes can be made with a stick.
Where the germinated seeds are consigned as identified families and labelled accordingly by the seed producer (as for AA DxP seeds), they are to be planted according to the same families and properly labelled right to the main nursery. This is to facilitate nursery culling, as the seedlings from the each family would be more uniform and the off-types readily spotted. However in the field planting, the seedlings are to be planted as mixed families.
Once the planting is completed, the identification tag must be stapled to the edge of polybag.
The Main Nursery
Polybag filling
Again, only the best topsoil is to be used in the large polybags . Prior to polybag filling, a basal application of 100g RP/polybag must be thoroughly mixed with the soil before filling.
Filling of the polybags should commence at least a month prior to the transplanting. Bags should be filled to the rim and set aside for a few weeks to allow for settling and soil topping up where necessary.
The large polybag of 38 cm (15in) x 45 cm (18in) x 500 gauges should be turned inside out before filling, to give the filled bag a stable and level base.
Hopper or funnels may be used for more efficient filling especially in large-scale nurseries.
Spacing of bags
Spacing of polybags in the nursery is done to minimise light competition between palms and for easy access to the palms for pest and disease control, weeding and manuring. The spacing and placement of seedlings at main nursery stage is shown in photo 4. The spacing of seedlings depends on the duration seedlings are expected to be kept in the nursery. The recommended spacing for various seedling ages at field planting is given in Table 1.
|
Table 1: Recommended polybag spacing in the nursery for various seedling ages at field planting
|
||
|
Age of seedling at field planting (months)
|
Triangular spacing of polybags in the nursery
|
|
|
(m)
|
(ft)
|
|
|
09-11
|
0.75
|
2.5
|
|
11-13
|
0.91
|
3
|
|
13-18
|
1.25
|
4
|

Transplanting from pre-nursery into large polybags (main nursery)
Prior to transplanting the seedlings to the large polybags, workers should prepare the planting holes within the bags. These holes can be prepared using core-borers. The pre-nursery seedlings should be given a thorough watering before the transplantings. To minimize disturbance of the roots, the bags should be cut open with a small blade and the seedling removed gently without disturbing the soil. The detached seedling together with the soil is placed in the planting hole of the large polybag, and the soil gently but firmly compacted around the root mass. Care must be taken to ensure that the planting is level with the pre-nursery soil level. A good watering should follow immediately. Mulching of the soil surface should be done with oil palm kernel shells.